- National Parks & Reserves
- Walking Hiking Trekking
- Inspiration
- Iceland
Travel advice for Iceland
From travel safety to visa requirements, discover the best tips for visiting Iceland
Book your individual trip, stress-free with local travel experts
The Laugavegur Trail is a few days of walking through Iceland’s highlands with nothing but wild terrain and weather for company. It’s not especially technical, but you do need to be prepared. If your Iceland trip includes this hike, this guide walks you through the route, logistics, and gear so you know what you’re getting into before you go.
The Laugavegur Trail is a 34-mile (55km) hiking route through Iceland’s Southern Highlands, running from Landmannalaugar to Þórsmörk. The name means “hot springs route,” and the trail lives up to it—there are geothermal pools, rhyolite mountains in all kinds of colors, moss-covered lava fields, black obsidian slopes, glaciers, and ash deserts.
It’s remote—no roads, no towns—just a string of mountain huts and campsites along the way. That isolation, combined with the constant shift in landscape, is what really defines the experience. You’re walking through active volcanic terrain, and it often feels like another planet.
Laugavegur, Iceland © Shutterstock
Most people take about 3 to 4 days to complete the trail, hiking around 8.5 miles (13.7km) a day. The standard route goes from north to south, starting in Landmannalaugar and ending in Þórsmörk—partly because the elevation gradually drops that way, and partly because that’s how the huts are booked.
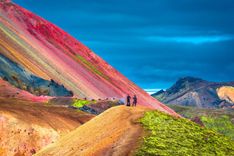
The trail starts with hot springs and colorful hills in Landmannalaugar, where you can take a dip before or after your trek. Around 75,000 to 100,000 people hike the trail every year, mostly in July and August.
The path itself isn’t too technical—it’s classed as moderate—but the weather is the tricky part. Conditions change fast, and you’ve got to be ready for rain, wind, fog, or even snow in the middle of summer. You can also tack on the Fimmvörðuháls trail at the end, which adds another 15.5 miles (25km) and takes you all the way to the town of Skógar.
You’ll start in the geothermal hills of Landmannalaugar, hike through the high-altitude obsidian fields around Hrafntinnusker, then descend into the lake-filled valley of Álftavatn.
After that, you cross black sand deserts near Emstrur before heading into the green birch forests of Þórsmörk. Each section feels completely different. In Hrafntinnusker, snow often lingers well into summer, and visibility can be limited by mist.
Álftavatn has open skies and still lakes, while Mælifellssandur feels like a black sand moonscape. Þórsmörk, by contrast, is full of plants and sits between three glaciers.
You’ll cross a few rivers along the way—some with footbridges (like Ljósá), others (like Þröngá) you’ll need to wade through. The whole trail is marked with blue stakes and yellow snow poles, though in bad weather, it’s easy to lose sight of them.
The trail itself is well maintained and straightforward, but there’s a steep climb on day one that catches people off guard. What really makes or breaks the hike is the weather. Early stages often get covered in thick fog, and snow patches can stick around even in July.
The Þórsmörk area gets a huge amount of rain—sometimes up to 30 feet a year—so staying dry can be a challenge. The terrain changes a lot too: you’ll walk on everything from lava rocks and loose gravel to packed snow and riverbeds.
The rivers vary—some are ankle-deep and easy, others are stronger and require caution. You don’t need to be an elite athlete to do this hike, but you should be comfortable walking for 5 to 7 hours a day while carrying a pack. Between the weather, the river crossings, and the remoteness, it’s more involved than a typical day hike, but definitely manageable with preparation.
Seljalandsfoss © Shutterstock
The Laugavegur Trail usually opens around mid-June and closes by mid-September, but these dates can shift depending on snow levels and weather. If there’s heavy snow or early storms, wardens might close it earlier. This summer window is the only real time to do the hike—outside of it, huts shut down and the conditions get too rough to recommend.
Most guided trips run in July and August, and that’s when conditions are usually the most reliable. July has the longest daylight and milder temperatures, but it's also when the trail gets the most traffic. August is still busy, but a little less so, and most of the snow has melted by then, which makes river crossings easier and the trail clearer.
June can be tricky—it might look open on paper, but snow coverage and high river levels from meltwater can make it tough going. On the other end, late September can bring early winter weather that closes things down fast. If you’re looking for the best balance, late July to early August is probably your safest bet.
The biggest challenge on this trail is the weather. Conditions can flip without warning, and you’re likely to face more than one type in a single day. Expect wind, rain, fog, maybe even snow—even in mid-summer. You’ll probably end up in your rain gear at some point no matter when you go.
High winds are common and can be intense, especially at higher elevations. Hypothermia is a real risk if you’re wet and exposed to wind for too long. Fog can also roll in fast and reduce visibility to a few feet, which makes navigation difficult even with trail markers.
Sudden cold snaps happen, and temperatures can drop fast, especially overnight or in the mountains. It's important to prepare for a range of conditions, even if the forecast looks fine at the start of the day.
If you're planning to hike the Laugavegur Trail, it's important to book your huts well in advance—especially in the summer. They fill up fast, and even camping spots need to be reserved ahead of time. Huts tend to sell out quickly, so locking in your accommodation is one of the first things to sort out.
Transportation is another key piece. Since the trail starts and ends in different places, and both are only reachable by highland buses or 4x4 vehicles, you’ll need to book buses early too. Trex and Reykjavik Excursions both run scheduled routes from Reykjavík, dropping you at the trailhead and picking you up at the end.
Physical prep also matters. This isn’t the trail to try out new boots or see how far you can push yourself. Start training a few weeks before you go, and make sure your gear is tested and weather-appropriate. Iceland’s conditions can change fast, so it’s a good idea to leave some flexibility in your return plans in case you need to finish early or wait out a storm. Having a backup night or two in Reykjavík is smart.
Most people take four days to hike the trail, which gives you enough time to enjoy the changing landscapes without rushing. A typical itinerary goes like this:
Some hikers push through in three days or even two, but that means combining stages and hiking longer days, which can be tough depending on the conditions. For example, the three-day version usually skips an overnight at Hvanngil or Álftavatn and goes straight to Emstrur.
If you’ve got extra time, consider adding the Fimmvörðuháls Trail. It connects Þórsmörk to Skógar and takes you over a pass between two glaciers, with views that are well worth the extra effort.
Also, don’t overlook the short trails around Landmannalaugar or Þórsmörk—they’re great for warm-ups or wind-downs and let you explore a bit more of the area.
You’ll typically hike 5–7 hours per day, depending on your pace, the weather, and how often you stop. Day 1 is the steepest—it starts with a big climb through the Laugahraun lava field and up to the Hrafntinnusker plateau. In good weather, it might take around 4–6 hours. Add time if there’s snow or wind.
Day 2 and Day 3 are more varied, with river crossings and sections like Mælifellssandur’s black sand stretch that can slow you down. These stages are flatter but still take a while, especially if the streams are high or there’s bad weather.
The final day to Þórsmörk involves the trickiest river crossings. If it’s rained recently, water levels can rise and make it harder to judge safe crossings, so give yourself extra time.
It’s smart to build in buffer time and avoid tight schedules at the end of your trip. Things often take longer than expected out there, and the last thing you want is to miss your bus because a river crossing took an hour longer than planned.
Laugavegur trail
Booking huts on the Laugavegur Trail isn’t complicated, but you’ll want to plan ahead. Each hut—Landmannalaugar, Hrafntinnusker, Álftavatn, Hvanngil, Emstrur, and Þórsmörk—charges 15,800 ISK (€107.63 / $112.63) per night for the 2025–2026 season. ]
During peak months, you’re required to book your huts north to south, so once your dates and direction are set, you won’t be able to switch it up last minute.
Reservations are handled by Ferðafélag Íslands (the Icelandic Touring Association), and summer dates can fill up months in advance. Don’t leave it too late.
Bus transport to and from the trail also needs to be sorted early—service is limited and runs on a tight schedule. Buses depart from Reykjavík, usually either from the BSI terminal or the Reykjavik Campsite on the outskirts of town.
Make sure your travel insurance includes emergency evacuation and trip cancellation—this trail is remote, and storms can disrupt even the best-planned itineraries. In rare cases, hikers have needed helicopter rescue, so it's better to be covered.
The huts along the trail are pretty basic but dependable. You’ll find them at every main stop: Landmannalaugar, Hrafntinnusker, Álftavatn, Hvanngil, Emstrur, and Þórsmörk. They have shared dorm rooms (no private space), a kitchen area with gas stoves and utensils, cold running water, and somewhere dry to crash for the night. You’ll need to bring your own sleeping bag.
If you're new to multi-day hikes or just want to avoid the hassle of carrying a full camping setup, staying in the huts is probably your best bet. They're not luxurious, but they’re warm and sheltered—which can go a long way in Iceland’s weather.
Camping is allowed near each hut, and those areas have basic facilities—usually toilets and sometimes showers. But don’t expect access to the huts themselves. That means no shared kitchen and nowhere inside to hang out, so you’ll need to be fully self-sufficient. Bring a solid tent, a well-insulated sleeping bag and pad, and everything you need to cook and stay dry, especially in wet or windy weather.
Getting to and from the trail is half the challenge. The road into Landmannalaugar is only accessible by specialized highland buses that can handle the rough tracks and multiple river crossings. The ride from Reykjavík takes about four hours, and you’ll need to book a bus that can handle F-roads (these are the mountain roads that standard vehicles aren’t allowed on).
Trex and Reykjavik Excursions both run regular highland bus services during the season, and they’re used to carrying hikers and gear. You’ll get luggage storage and decent seating, but trips can be delayed or cancelled due to road conditions, especially after heavy rain. It’s smart to book both your inbound and outbound buses at the same time so you don’t get stuck waiting for a seat later.
If you’re thinking about driving, you’ll need a 4WD vehicle with high clearance and river crossing capability—and the insurance to match. Some hikers rent a car one-way to Landmannalaugar and return by bus from Þórsmörk, but that means leaving the car at a remote trailhead for days, which not everyone’s comfortable with.
Bringing the right gear can make or break your experience on the Laugavegur Trail. You don’t need mountaineering equipment, but you do need to be prepared for cold, wind, and sudden weather shifts. The wind, especially, can be brutal—way worse than what the forecast might suggest.
Start with the basics: waterproof hiking boots that are already broken in and have good ankle support, thermal tops, and breathable base layers (wool or synthetic). You’ll want a waterproof jacket with a hood that can handle wind, plus waterproof trousers. If you're camping, bring your own stove and cookware.
When it comes to tents, don't prioritize weight over quality. A flimsy tent won’t stand up to strong winds or driving rain, which are both common out there. Bring a solid sleeping system too—a sleeping bag that can handle cold nights and a decent sleeping pad.
The easiest way to navigate the trail is with a GPS app on your phone. Apps like Gaia GPS, AllTrails, and CalTopo all have detailed topo maps of the Laugavegur route. Make sure to download maps for offline use—there’s no cell service for most of the trail.
Even with a GPS app, bring a backup: paper map and compass, plus a GPS device if you have one. Electronics can fail—batteries run out, screens break, and bad weather can mess with signals.
The trail is marked with wooden stakes and yellow poles, but in fog or snow, it’s easy to lose track. If you're hiking solo or expect bad weather, carrying a personal locator beacon is a smart move.
You’ll need to be ready for everything from wind and rain to surprise snow—even in midsummer. Think in layers rather than one heavy item. Your base gear should include those waterproof boots, a breathable rain jacket with a hood, rain trousers, and warm socks (bring a fresh pair for each day). Add a warm layer like a fleece or lightweight down jacket for evenings.
Don’t forget a few extras: sandals or neoprene shoes for river crossings, a buff or scarf, gaiters (especially in June), and a swimsuit for soaking in the hot springs at Landmannalaugar.
For camping, you’ll want a good sleeping bag rated for cold nights, a well-built tent, and a sleeping pad for warmth and comfort. Bring a lightweight stove, fuel, and whatever utensils you’ll need to cook on trail.
You’ll burn more calories than usual, so plan to bring plenty of high-energy, lightweight food. This might be dehydrated meals, trail mix, dried fruit, nuts, and energy bars.
Fuel canisters can’t be flown in, so you’ll need to buy them once you arrive in Iceland. One 230g canister usually lasts one person about three days, or enough for two people to get through the whole trek if you're efficient.
Water is usually easy to find—every hut has a nearby source, and you’ll pass plenty of streams. Most people drink straight from the streams without issue, but carrying a lightweight filter or purification tablets gives you some peace of mind, especially with glacial runoff or smaller streams.
Weather on the Laugavegur Trail can change fast, even in the middle of summer. This is a remote trail—there are no roads, and help can take hours to arrive, even in good conditions. The key is to prevent problems before they start. That means packing smart and knowing how to handle things on your own.
Most serious problems on the trail come down to weather: hypothermia, getting lost in fog, and accidents at river crossings.
At a minimum, bring a GPS device, map, first aid kit, emergency shelter, and travel insurance. A satellite messenger is worth carrying if you're worried about emergencies—it can call for help when you’re out of cell range, but response times can still be slow.
River crossings on the trail range from easy to challenging. Some are shallow enough to step over, but others, like Þröngá, can be tricky—especially after rain. Water levels rise fast, and the rocky bottom can make footing unstable.
Always unbuckle your pack before stepping in, and look for the widest section to cross—it’s usually shallower and less forceful. Use trekking poles if you have them; they help a lot with balance on slippery or uneven riverbeds.
Don’t attempt a crossing if the current looks too strong—turning back is safer than getting swept away. Bring proper footwear, like sturdy water shoes or sandals with good straps. Flip-flops won’t cut it—they’ll get ripped off your feet, leaving you stuck in freezing water barefoot.
It’s also best to cross early in the day when water levels tend to be lower. Avoid river crossings during or just after heavy rain, when the flow is at its strongest.
Before you head out, check the weather forecast specifically for the Laugavegur Trail. On the Icelandic weather site, find the little exclamation point symbol in the southern highlands to get the right info. Be ready for anything—freezing rain, strong wind, and fast-moving storms are common even in summer.
To avoid hypothermia, staying dry and warm is crucial. If you notice shivering, confusion, or clumsiness, stop immediately and warm up—those are early signs.
Bring a good rain jacket, waterproof pants, and a pack cover. Don’t bury your emergency shelter or warm layers deep in your bag—you might need them fast. High winds on the ridges can make it feel much colder than it is. If conditions get bad, turning around is often the smartest move. Trying to push through bad weather usually makes things worse.
If you’re hiking solo, you’ll need to plan more carefully. That includes carrying gear like a GPS, map, first aid kit, and emergency shelter—as well as a satellite messenger or Personal Locator Beacon (PLB). These devices can call for help if something goes wrong and no one else is around.
Leave your itinerary with someone back home and set up regular check-ins. Let them know exactly when to worry and what to do if you don’t report in.
Solo hiking on this trail also means carrying extra food, warm clothes, and a backup way to navigate in case one device fails.
Bad weather doesn’t just slow you down—it makes navigation harder too, and it’s riskier when there’s no one else to help figure out the trail. If the forecast looks rough, consider waiting it out. Hiking solo gives you less room for error, so play it safe.
Choosing between hiking the Laugavegur Trail on your own or going with a guided group mostly comes down to how experienced and prepared you are, and how much support you want along the way. Doing it solo is way cheaper and gives you full control over your pace and plans—but it also means carrying all your own gear, organizing transport, booking huts, and being ready to handle unpredictable weather without help. You’ll need to be comfortable with navigation, river crossings, and making safety calls in isolated areas.
If you’ve done multi-day hikes before and know your way around a backpack and a topo map, a self-guided hike is totally doable in summer. But you’ll need to sort everything yourself: hut bookings, food planning, transport, gear, safety prep, and checking the weather.
There’s a lot to love about hiking independently—going at your own pace, stopping for photos whenever you want, and adjusting your plan as you go. It’s also a challenge that feels pretty satisfying when you pull it off.
That said, Iceland’s highlands are no joke, and if you’re not confident in your skills or gear, it’s worth thinking twice. You'll be carrying everything you need, cooking for yourself, and relying on your own judgment when conditions shift.
Going with a guide makes the whole experience more relaxed. You don’t have to think about transport, maps, or weather forecasts—they’ve got it covered.
Guides know the trail, the huts, and how to keep a group safe and moving. They’ll share local stories, geology facts, and take you on small detours you might not find on your own.
Meals, group gear, and transport are usually included, and since they handle luggage transfers, you’re only hiking with a light pack. Having an expert around also really matters when river crossings get tricky or storms roll in—they know when to push forward and when to wait it out. If you're new to multi-day hiking or just want to focus on the scenery instead of logistics, this is probably the easier path.
Reach out to get a free quote from our tailor-made travel local experts.
written by
Dre Roelandt
updated 17.07.2025
Dre Roelandt is originally from the United States but lives and works in Berlin, Germany. Dre is a freelance writer and artist with a passion for travelling. They are an in-house Senior Content Editor at Rough Guides.
Use Rough Guides' trusted partners for great rates
From travel safety to visa requirements, discover the best tips for visiting Iceland
Discover Iceland's most captivating stories